How to Install and Maintain an Outdoor LED Advertising Screen
The screen you buy is only half the project — the other half is the structure it stands on and the way it gets serviced. This guide covers the installation and maintenance plan for an ASE10 outdoor LED advertising screen system, written for project owners and installing contractors.

Step 1: Structure and Foundation
Because the ASE10 cabinet is a fixed 960×960×145mm footprint, structural design starts with simple arithmetic. A 9.6×4.8m screen is 5 columns × 8 rows of cabinets, weighing and loading predictably. Your steel supplier needs only three inputs:
- Screen dimensions in whole cabinets
- Mounting type: wall-mounted frame, free-standing pylon, or rooftop plinth
- Local wind-load code
For most roadside pylons, a standard unipole or twin-pole structure is pre-engineered and does not need custom design.

Step 2: Mounting the Cabinets
Cabinets hang on the frame from the top edge and lock at four points — a two-person job per cabinet with basic lifting equipment. Alignment relies on machined cabinet edges, not installer skill: butt the cabinets, lock the latches, and the 10mm pixels stay within spec across the entire face.
Wall-mounted and bracket installations follow the same logic on a shallower frame.
Step 3: Power and Signal
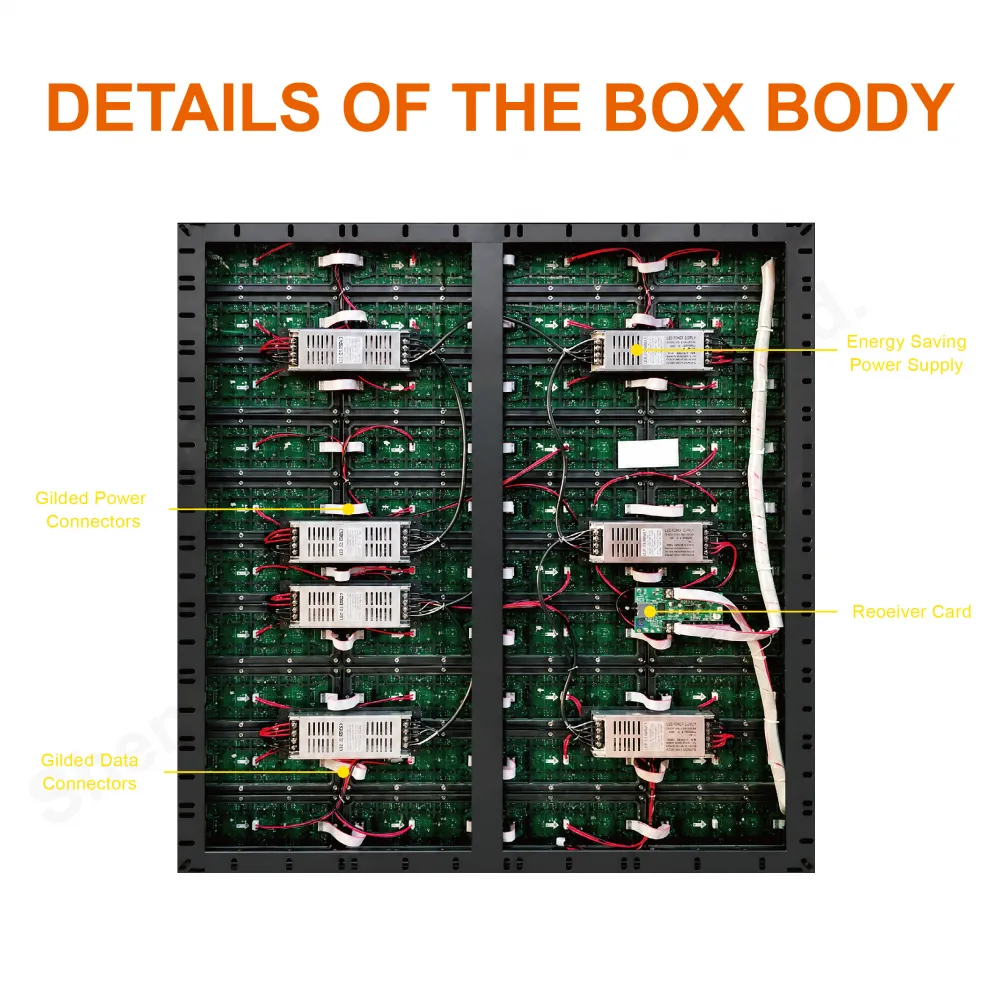
Each cabinet draws from a Muen-brand switching supply on 200–240VAC. Cabinets daisy-chain power and connect to a Novastar receiving card chain that runs back to the sending unit in your equipment room. Planning rule of thumb: one 220V circuit per 4–6 cabinets, and a single Cat6 loop per column.
Step 4: Why Rear Service Changes Your Building Design
The ASE10 is a rear-service cabinet: every module, power supply and receiving card is accessed from behind. This has direct architectural consequences:
- No walk-in corridor is required, so the screen can sit 145mm from the supporting wall — a huge win for facade retrofits where depth is scarce
- No scaffolding or crane in front of the screen during service — safer and faster
- Technicians work standing in ordinary weather conditions, which measurably shortens repair times

Step 5: Commissioning
With Novastar control, commissioning is a routine half-day: calibrate brightness across cabinets, set the auto-dimming schedule for night operation, load your content system, and verify the 1920Hz refresh on camera. From steel to first frame, a 9.6×4.8m installation typically completes in three to four working days.
Maintenance Rhythm
| Interval | Task |
|---|---|
| Weekly | Visual check of the face from distance; review system alerts |
| Quarterly | Rear-panel inspection: connectors, fans, power terminals |
| Yearly | Backup structure bolt torque check; drainage inspection; full-color calibration |
Rear service plus the standard Novastar ecosystem means any local integrator can maintain the screen — you are never locked to one vendor for the screen’s decade of life. For structural drawings and cabinet-level accessories, see the ASE10 product page.