Step by step guide for LED screen installation
1.Introduction

1.Why Choose an LED Screen
LED screens have become a popular choice for both commercial and personal use due to their exceptional display quality and versatility. Whether you’re looking to enhance your business signage, create an immersive environment for events, or upgrade your home entertainment system,LED screens offer unmatched brightness, energy efficiency, and clarity. Unlike traditional display options, LED technology provides vivid colors and sharp images, making it ideal for indoor and outdoor applications alike.
2.Benefits of Installing an LED Screen

The installation of an LED screen brings several advantages. First and foremost, LED screens are known for their superior picture quality. With high brightness, excellent contrast, and wide viewing angles, they ensure that your content looks stunning from any perspective. Additionally, they are energy-efficient, helping reduce electricity costs in the long term. LED screens are also durable and low maintenance, with longer lifespans compared to other types of displays. The versatility in design options allows for seamless integration into various environments, whether it’s for advertising, entertainment, or informative purposes. Lastly, LED screens are highly customizable, allowing you to choose from a range of sizes and configurations to suit your specific needs.
2.Preparation

1.Choosing the Right Installation Location and Environment
The success of your LED screen installation begins with selecting the right location. Consider factors such as visibility, accessibility, and environmental conditions. If you’re installing an outdoor LED screen, make sure the location is sheltered from direct sunlight or harsh weather conditions. For indoor installations, ensure the area has adequate space and proper ventilation to prevent overheating. Also, take into account the viewing angle, ensuring the screen will be visible to your audience from various positions. Ensure that the installation surface is stable and able to support the weight of the screen, whether it’s a wall, ceiling, or custom frame.
2. Gathering Necessary Tools and Equipment
Before beginning the installation process, make sure you have all the necessary tools and equipment on hand. Key items typically include a drill, screwdriver, level, measuring tape, wrench, power cables, signal cables, and a suitable mounting bracket. You may also need additional items like cable ties, wall anchors, or a power supply, depending on your specific installation type. Double-check that all components are compatible with your LED screen and installation setup to avoid delays during the process.
3. Safety Precautions
Safety should always be your top priority during the installation of an LED screen. Ensure that the area is clear of obstacles and that you have a stable ladder or scaffolding for working at height. Always wear appropriate personal protective equipment (PPE), including gloves, safety glasses, and non-slip shoes. Before working with electricity, turn off all power sources and verify that circuits are de-energized. Additionally, be mindful of the weight of the LED screen and enlist the help of others when lifting heavy components. Follow manufacturer guidelines for the correct installation procedure, and if necessary, consult with a professional installer to avoid any mishaps.
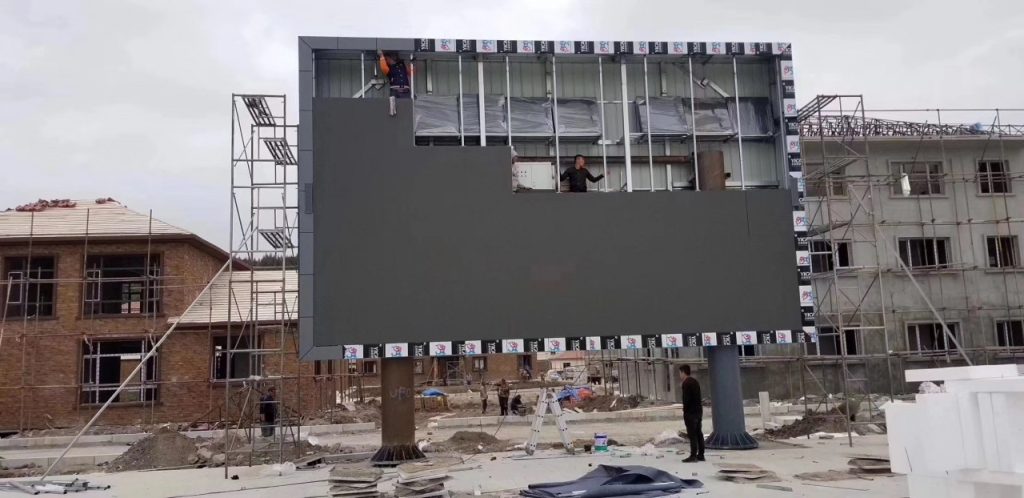
3.LED Screen Installation Steps

Choosing the Right Installation Method (Wall Mount, Hanging, Stand, etc.)
The first step in the installation process is selecting the right installation method based on the environment and intended use of your LED screen. There are several options, including:
Wall Mounting: This is a popular option for fixed installations in spaces where the screen will remain stationary. It helps save space and provides a sleek, professional look. Ensure the wall is sturdy enough to support the weight of the LED screen and the mount.
- Hanging Installation: For large LED screens in venues like concert halls or stadiums, a hanging installation may be required. This involves suspending the screen from the ceiling using appropriate brackets or a rigging system. Make sure the ceiling can bear the weight of the screen and that the installation meets safety standards.
- Stand Installation: If mobility is required, a free-standing setup may be ideal. These installations are common for trade shows or events where the screen needs to be moved around. The stand should be stable enough to support the screen without tipping over.
Consider your location, screen size, and specific needs when choosing the method that best suits your project.
Installing the Frame and Bracket
Once you’ve selected the installation method, it’s time to install the frame or bracket. Start by positioning the frame or mounting bracket at the selected installation location. Use a level to ensure it’s aligned properly and mark the drill points on the wall or ceiling. For wall installations, drill pilot holes and insert wall anchors to support the weight of the frame and the screen.
For ceiling-mounted or hanging installations, ensure the bracket is securely attached to the structural beams, using heavy-duty anchors or a suspension system designed for such purposes. Double-check all screws and bolts to ensure they are tightly fastened, as any loose connections could affect the stability of the screen.
Connecting Power and Signal Sources
After the frame or bracket is installed, you can proceed with connecting the necessary power and signal sources. Start by positioning the power cables to avoid tangling or stretching. Plug the power cable into a properly grounded electrical outlet, ensuring the power supply meets the LED screen’s requirements.
For signal connections, depending on your setup, connect HDMI, VGA, DVI, or other appropriate signal cables from the source (such as a media player, computer, or video processor) to the LED screen’s input ports. Make sure the connections are secure and follow the manufacturer’s instructions for signal routing. Test the signal by powering on the system to confirm that the display is receiving input and working correctly.
Once everything is securely connected, you can proceed with the final adjustments and testing to ensure optimal performance.
4.Calibration and Testing

1. Adjusting Screen Brightness and Contrast
Once the LED screen is installed and connected, the next step is to adjust the screen’s brightness and contrast. Proper brightness settings ensure that the content displayed is clear and visible under different lighting conditions, whether it’s in a well-lit room or an outdoor setting.
To adjust the brightness, access the screen’s settings menu and increase or decrease the brightness level according to the environment. For example, outdoor screens generally need higher brightness settings to combat sunlight, while indoor screens can function well with lower brightness. Similarly, adjust the contrast to enhance the sharpness and clarity of the image. The contrast should be set high enough to provide a clear distinction between dark and light areas, but not too high that it causes a loss of detail in the image. Always fine-tune these settings to find a balance that delivers optimal viewing without straining the eyes.
2. Calibrating Color and Image Quality
Color calibration is a crucial step to ensure that the LED screen displays vibrant, true-to-life colors. Start by adjusting the color temperature to match the surrounding environment. Some screens allow you to select preset modes such as “Warm,” “Cool,” or “Neutral.” For precise calibration, you may want to use color calibration tools to achieve the most accurate colors possible.
Next, adjust the color saturation and hue settings. This will help ensure that reds, greens, blues, and other colors appear as they should. It’s important to achieve natural skin tones and realistic shades, especially for applications where image quality is paramount (such as advertising or video content). In addition, check the sharpness to ensure that images are crisp and clear without being overdone, which could introduce unwanted noise or distortion.
3.Testing and Optimizing Display Performance
After making adjustments to brightness, contrast, and color, it’s important to test and optimize the overall performance of the LED screen. Begin by playing a range of content, such as high-definition videos, images, and graphics, to assess the screen’s ability to reproduce various types of visuals. Pay attention to the display’s response time, resolution, and clarity. Look for any distortion, pixelation, or color shifts that might indicate an issue.
Test the viewing angles to ensure the screen performs consistently across different points of view. LED screens are generally designed for wide viewing angles, but it’s still important to verify this across the installation space.
If the screen includes interactive features, like touch functionality or integrated sensors, test these as well to confirm that they are responding correctly. For outdoor screens, assess how well the display performs in different weather conditions and lighting environments.
Finally, optimize the display by making any necessary adjustments to reduce power consumption without sacrificing display quality. Ensure the screen is operating at its most efficient level, providing great visuals while saving energy.
5.Common Issues and Solutions

1.Potential Problems During Installation
During the installation of an LED screen, various challenges may arise. Some common problems include:
- Uneven Mounting Surface: If the surface where you plan to mount the screen is uneven, it could cause the screen to tilt or not sit properly. To solve this, ensure that the installation surface is flat and stable. Use a level to double-check before securing the screen.
- Incorrect Cable Connections: Sometimes, cables may be incorrectly connected, leading to a lack of signal or power. Always verify that the cables are securely connected to both the screen and the signal source. Double-check all ports and connectors for compatibility and proper insertion.
- Improperly Sized Brackets or Mounts: If the frame or mount doesn’t fit correctly with the screen, the installation process can be delayed. Make sure you’ve selected the right size and type of brackets for the specific screen model and installation environment. Follow the manufacturer’s guidelines for bracket selection.
2.Troubleshooting Power or Signal Issues
Power and signal issues are common challenges when setting up an LED screen. Here’s how to address them:
- No Power: If the screen doesn’t power on, first check the power supply. Ensure that the power cable is connected to a functional outlet and the screen’s power switch is turned on. Check if any circuit breakers have been tripped. If necessary, try using a different outlet to rule out electrical issues.
- No Signal Displayed: If the screen is powered but not displaying any content, check the signal cables (HDMI, VGA, DisplayPort, etc.). Make sure the cable is firmly connected to both the screen and the signal source. If the connection appears fine, test the source device to ensure it’s sending a signal (e.g., try a different video player or computer). Additionally, check if the screen’s input settings are correct and match the signal type.
- Flickering or Blurry Image: If the image appears flickered or blurry, check the resolution settings on both the screen and the connected device. Ensure the resolution is set appropriately for the screen’s native resolution. If the flickering persists, inspect the cables for damage or interference and replace them if necessary.
6. Conclusion
Summarizing the Installation Process
In summary, installing an LED screen requires careful planning and execution. Start by selecting the right installation method, gathering necessary tools, and ensuring safety precautions are followed. Then, proceed with installing the frame and connecting the power and signal sources. Calibration and testing ensure that your screen operates at its full potential, with proper brightness, contrast, and color quality.
Common installation challenges, such as improper mounting, incorrect cable connections, and power or signal issues, can be easily resolved by following the appropriate troubleshooting steps. With attention to detail and a systematic approach, the LED screen installation process can be seamless and efficient.