How to install LED billboards on trucks?
Mobile billboards on vans have achieved impressive marketing results in the advertising industry. Have you ever considered owning your own van-based mobile billboard? Use it to promote your ads or participate in temporary events.
How to make a LED billboard on a van—hopefully this article will help you understand.
 Three Sided LED Billboard Van
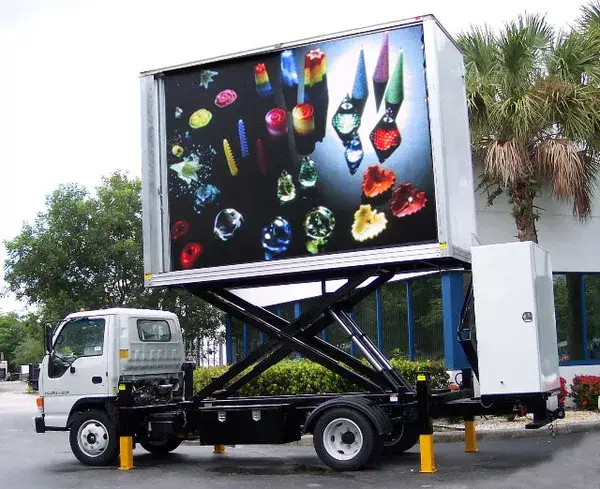
Confirm the installation surface
Before preparing to install an LED billboard on a van, you need to first confirm the number of van panels you wish to install the LED billboard on.
Generally, you can modify the left and right sides, as well as the rear side of the van into LED billboards. Most people opt for either installing LED screens on the left and right sides only, or installing LED screens on all three sides (left, right, and rear).
Comparing the two options, installing LED screens on two surfaces is more cost-effective but offers less advertising display area; installing LED screens on three surfaces is relatively more expensive but provides a larger advertising display area and broader marketing reach.
Confirm the installation method
There are two main installation methods for LED billboards on vans: embedded and wall-mounted. You can decide in advance which installation method to use based on your needs.
Embedded installation
Embedded installation of an LED billboard requires modifying the van by cutting, grinding, and painting the original exterior walls of the cargo compartment to create an opening slightly larger than the LED billboard dimensions. A steel structure frame is then assembled in the cut-out opening to facilitate the subsequent installation of the LED cabinet.
This embedded installation method is generally more aesthetically pleasing and modern, but the installation timeline is slightly longer than wall-mounted installation, and it significantly alters the vehicle’s exterior appearance.
When using embedded installation, it is also necessary to consider whether the modification of the van complies with local laws, as some regions have legal restrictions on vehicle modifications.
Wall-mounted installation
Wall-mounted installation involves directly drilling holes in the van body to install a steel structure support, then mounting the LED cabinet on the steel structure to complete the installation of the LED billboard on the van.
Its installation process is simpler than the embedded installation method, but after using the wall-mounted installation method, the rear end of the LED billboard is fixed in place, so it can only be maintained from the front. Typically, front-maintenance LED cabinets are more expensive, so although the installation process for the wall-mounted installation method is simpler than the embedded installation method, the cost of purchasing the LED cabinet is higher.
Additionally, the van-mounted LED billboard achieves its marketing effect through continuous movement, which poses significant challenges to the stability of the LED billboard during this process. Wall-mounted installation, due to its outward-projecting structure, has lower overall stability compared to embedded installation.

Commercial Design Plan
Before proceeding with the production of the van-mounted LED billboard, you must first develop a design plan, specifying the LED billboard’s dimensions, pixel pitch, brightness, and other performance specifications.
Van-mounted LED billboards are a type of outdoor LED screen, and they have high requirements for LED screen brightness, typically needing to reach 4,500 to 5,500 nits.
Considering the clarity of the advertising content, the selection of pixel pitch for the LED billboard must also be carefully considered.
Of course, if you find this process challenging or cumbersome, MuenLED can assist you in planning all component specifications and production processes, integrating them into a comprehensive commercial design proposal for your review.
You only need to review the content and say “no” to any unsatisfactory parts; we will continue to modify the plan until you are satisfied.
Frame construction
The steel structure support is responsible for securing the LED cabinets to the vehicle. A stable and reliable frame structure ensures safer operation of the LED billboard.
If you choose an embedded installation, the vehicle must first be modified by cutting, followed by the installation of the steel structure support; if you choose a wall-mounted installation, simply drill holes in the vehicle body to install the steel structure support.
Installing the LED Cabinet
After installing the steel structure support, we can proceed with installing the LED cabinet. Secure the LED cabinet to the steel structure from bottom to top. The cabinets are equipped with quick-release locks that can be used to secure them together.
During the installation of the LED cabinets, care must be taken to maintain stability and avoid any collisions with the LED panels. Although the LED panels have a protective structure similar to a resin layer, in the event of a severe collision, the resin layer alone is insufficient to prevent damage to the LED diodes. Therefore, such situations must be avoided as much as possible.
Connecting cables and the generator
LED billboards require stable voltage and current to operate normally. Since a van is a mobile vehicle, it cannot provide stable voltage for the LED billboard. Therefore, a gasoline or diesel generator must be installed to supply power to the LED billboard.
Generally, the voltage for LED screens ranges from 110V to 220V. We must first calculate the specific power requirements based on the specifications and dimensions of the LED billboard, then select an appropriate generator based on the calculated power. Additionally, an inverter is needed to convert the generator’s alternating current (AC) into direct current (DC) suitable for the LED screen.
Use cables and signal lines to connect the installed LED cabinets, ensuring the connection sequence strictly follows the diagram. Then connect the LED billboard’s main cable to the inverter and generator.
Operational Testing
After the LED billboard on the van is installed, we can power it on at the site to test the LED billboard and identify any issues in advance. Additionally, video control software can be used to adjust the display effects of the LED billboard on the van, such as contrast, brightness, and refresh rate. After adjustment, the LED billboard’s visual clarity is enhanced, providing a better viewing experience and naturally improving advertising effectiveness.
Waterproofing
Although the LED billboard, as an outdoor LED display, has an IP65 protection rating and some waterproofing capabilities, some users opt for additional protection by installing a simple rain shelter on the roof to prevent heavy rain from affecting the LED billboard on the van.
Notes
Choose professional installers
When installing an LED billboard on a van, it is advisable to choose professional installers. Their installation techniques are more stable and reliable, reducing the likelihood of the LED screen being bumped or damaged. Additionally, professional installation teams can complete the installation more quickly, helping you save time and costs.
Selecting an LED Manufacturer
Select an LED manufacturer with more experience, as their product quality is superior and reliable. For example, MuenLED has over a decade of experience in LED screen production and uses high-quality Nationstar LED lamps, ensuring vibrant colors, higher contrast, and an LED screen lifespan of over 10 years.
Content Creation
Since van LED billboards constantly move through the city, it is advisable to use eye-catching, simple text and vibrant colors in the advertising content to quickly attract pedestrians’ attention, make them notice the relevant information, and leave a lasting impression.
Alternatively, you can incorporate compelling brand stories into the visuals, as narrative elements can evoke emotions and leave a deeper impression on the audience.
Conclusion
We believe that through this article, you have learned how to create an LED billboard for a van. This process is not complicated; as long as you understand the process and follow it, you will certainly achieve an ideal van LED billboard.