How to correctly set up LED walls for operation?
LED walls revolutionized digital display technology to become the crucial solution for advertising and live entertainment presentations. LED display system effectiveness depends on proper setup installation regardless of whether display service areas lie in public locations or corporate facilities. A proper setup ensures that LED walls function efficiently alongside visual excellence during operation.
Step 1: Planning Your LED Wall Setup
A proper planning process establishes the basis needed to successfully deploy an effective LED wall system. The planning steps of a project determine both its operational length and stress resistance ability together with its maximum operational capabilities.
Outdoor Installation with Cabinet vs. Indoor Installation Without Cabinet

- Outdoor LED Walls demand weatherproof cabinets along with high brightness specifications, while robust mounting equipment must be deployed to guard against wind exposure, rain elements, and intense sunlight in outdoor conditions. Steel frames and protective enclosures become mandatory for every installation that aims for sustained operational run time.
- A direct attachment of LED modules to frames stands as the main requirement for indoor LED wall installations in combination with specialized skills for delivering consistent visual output. The success of controlled indoor installations relies on their appropriate ventilation system paired with the highest resolution components connected to perfectly designed mounting frames.
Determining the Purpose and Location
- The purpose of the LED wall installation needs clear definition regarding its planned use between commercial advertising and sports presentations along with entertainment and business presentation requirements.
- Assessment of the screen will decide whether to keep it permanently mounted on a frame or build it for transportation.
- Select a location that provides clear visibility and controls both system disturbance and ambient lighting to optimize the display quality.
- Future maintenance requires straightforward access to every necessary operational area for possible future maintenance activities.
Calculating Screen Size and Resolution
- Selection of screen dimensions follows three main criteria that pair distance measurements with audience sizes and material characteristics.
- Pixel pitch determines the entire quality of resolution.
- The pixel dimension range for indoor short-range observation should stretch from 1.5 mm to 3 mm.
- The pixel pitch range for distance-based outdoor viewing needs to be set between 5 mm and 10 mm.
- Using the suitable aspect ratios (including 16:9 and 4:3) and specially designed formats helps optimize your content space management.
Structural Support and Power Needs

- Open-air steel structures must have enough strength to resist weather changes in the open environment.
- Indoor display mounting options include wall attachments, ceiling mounts, and independent frame mounting, which customers can choose according to their preferences.
- Before power installation of an LED wall, verify its power requirements to determine its power needs and then evaluate if the existing electrical setup meets these requirements.
- To stop electrical mishaps, you need to put in voltage regulators that operate side by side with surge protectors.
- Display thermal management systems require ventilator and cooling elements that need to reach all points of high-brightness display visibility.
Budget Considerations
- All expenses for LED panel purchase and controller equipment installation, cabling, mounting hardware expenses, and maintenance costs should be included in the project financial plan.
- Power usage expenses and maintenance fees should be included in your yearly operational spending.
- The use of second-hand equipment with leasing arrangements for LED displays and design setups enables you to negotiate limited funding constraints.
- Consult different manufacturers and vendors who provide quality materials at reasonable costs.
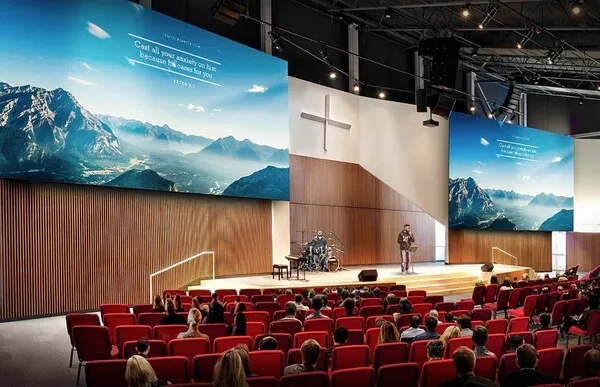
Step 2: Selecting the Right LED Panels
Choosing the correct LED panels stands as the vital step to producing display outputs of high quality. The selection process for LED panels must evaluate pixel pitch alongside brightness levels, refresh rate, color accuracy, and modularity parameters.
Understanding Pixel Pitch and Resolution
![]()
The arrangement of LED pixels during production is controlled by pixel pitch, which establishes how resolution and image quality appear. Pixel pitch values in displays link to distance requirements that emerge from target end-user conduct.
- LED pixels spaced less than 3 mm produce bright visual presentations that reveal minute details during nearby observation.
- LED displays featuring 5mm to 10mm pixel pitch dimensions succeed at showing outdoor big-format pictures from distant viewpoints.
- Control rooms and boardrooms, alongside sites with exceptional display requirements, find the most value from LED panel installations operated at under 1.5 mm distance.
Brightness Levels (Indoor vs. Outdoor)
Different lighting situations require LED panel illumination systems to adjust their output through the measurement of nits for producing suitable display results.
- Outdoor LED walls should modify their brightness setting from 5000 nits to 10000 nits in order to achieve the best results for daytime sunlight content viewing.
- Indoor LED walls operate optimally when set to 500–1,500 nits while maintaining power efficiency.
- The adjustable brightness panels provide users the capability to optimize their energy efficiency in various environmental conditions.
Modular vs. Pre-Assembled Panels

Companies can configure LED walls through either standalone modular panels or complete pre-built assembled units, which bring separate advantages.
Modular Panels:
- Your system should give users the ability to tailor their needs and expand operations.
- The replacement of failed single modules remains simple.
- The product enables seamless expansion of video wall systems.
Pre-Assembled Panels:
- Pre-assembled units provide quick installation but restrict customization flexibility.
- These systems serve rental purposes together with mobile applications that require fast setup and deployment.
- These panels arrive with built-in power and processing features from the manufacturer.
Refresh Rate and Color Accuracy
True, vivid picture quality and smooth motion require both high refresh rates and exact color accuracy:
- Multiple video contents benefit from refresh rates exceeding 1920 Hz because this eliminates screen flicker significantly.
- Color calibration features guarantee equal color distribution between each panel, thus preventing visual mismatches between them.
- Some high-end LED displays include HD-ready functionality called HDR, which delivers realistic imaging through improved contrast along with advanced color depth.
Viewing Angle and Panel Durability
- The image quality stays pronounced and vivid throughout all different viewing positions because of wide viewing angle capabilities.
- The performance attributes regarding durability must incorporate IP65 or higher ratings for weather resistance on outdoor panels and a long operational lifespan as a minimum specification for indoor panel design.
Energy Efficiency and Heat Dissipation
- Low Power Consumption: Pick monitors with low energy requirements while maintaining bright images.
- Efficient Heat Dissipation: Built-in cooling fans and passive heat dissipation mechanisms ensure heat escapes, therefore preventing failure, which is vital for indoor and outdoor usage.
Step 3: Preparing the Installation Site
The correct setup of the installation site leads to trouble-free assembly work while reducing mistakes that might occur during installation. The entire display’s longevity and performance stability directly depend on site preparation methods used specifically for both indoor LED walls together with outdoor LED walls.
Surveying the Location
- The inspection team must explore the site to verify the terrain features, environmental elements, and structural conditions.
- Assess places where hazards like extreme weather elements, dust intake, humidifying conditions, and heavy traffic could compromise the LED wall structure.
- Before constructing an outdoor LED wall, check that environmental factors such as wind pressure, water exposure, and sunlight damage can be sustained. To achieve extended service, the system requires waterproof protection together with shadowing features.
- When installing screens inside buildings, evaluate how lighting conditions interact with screen visibility along with reflection patterns and optimal viewing positions.
- Ensure that the location where you will install the facility allows heavy pane transport with safe access for mounting equipment and maintenance staff.
Measuring and Marking the Installation Area
- Mark the precise installation dimensions by applying laser guides with levels and tape measures as measuring instruments.
- Test the horizontal and vertical orientation of the mounting surface designed to support the LED wall.
- The correct positions of all support structures, together with brackets and electrical connections, need to be outlined to enable smooth installation procedures.
- Investigate the structural depth and the thickness of the walls to determine proper mounting potential for LED components.
- Create a strategic maintenance area and cooling airflow space that surrounds the LED wall setup.
Ensuring Ventilation and Power Supply
- LED panel overheating requires sufficient ventilation to operate correctly regardless of indoor enclosure configuration.
- For temperature control in LED displays, use cooling fans with air venting facilities or heat dissipation methods.
- Proper power supply planning must establish enough reliable power capacity to support the entire LED wall setup.
- The display needs protected electrical circuits with surge protection to avoid both voltage spikes and physical damage to its components.
- Determine outdoor display protection by implementing waterproof electric enclosures while securing all wiring connections to fight environmental moisture damage and physical attacks.
- Establish the most optimal path for power cables alongside signal wires in order to minimize both congestion and interferences. The installation of cable trays together with conduits or hidden cable management systems will deliver both professionalism and a neat aesthetic.
Step 4: Building the Support Structure

The stabilization and security of an LED wall come from a well-constructed mounting system. Support system choice depends on the LED display dimensions along with its positioning factors along with its application requirements. A correctly engineered support system locks LED panels into position while preserving alignment and protects them against environmental threats and movement.
Wall-Mounted vs. Freestanding Setups
The selection of appropriate LED wall support methods determines both performance excellence and long-lasting durability:
Wall-Mounted LED Walls: Customers seeking indoor installations should consider wall-mounted LED walls, which use existing walls as their support structure to save space. They require:
- The structure must maintain excellent stability and a solid foundation to support the wall.
- A correct measure and level operation guarantees perfect and even display alignment.
- The arrangement of cables needs attention to hide both wires and connections.
Freestanding Structures: Independent support separates freestanding structures that function either outdoors or for enormous indoor showrooms. These structures require:
- A heavy-duty steel or aluminum frame to withstand weight and external forces.
- The foundation must be exceptionally strong to withstand wind pressure, particularly in outdoor setups.
- Outdoor displays can employ protective coverings such as enclosures or coatings that shield against environmental elements.
Suspended or Curved Configurations

Expert installations need custom mounting approaches to function properly:
Hanging or Suspended LED Walls: Events like stage performances along with concerts use hanging or suspended LED walls that need the following characteristics:
- Weight distribution in these systems occurs through reinforced truss mechanisms.
- Installation points must be secured to avoid movements and shaking.
- Additional safety measures, such as steel safety cables, in case of hardware failure.
Curved LED Walls: Curved LED walls in exhibition showrooms and control rooms need these requirements:
- The LED panels require dedicated frame designs for proper implementation of their curved shapes.
- The display requires flexible panels together with panel technology designed for a smooth visual presentation.
- The system needs exact positioning to create an even distribution of brightness along with optimal image quality throughout its curved area.
Ensuring Stability and Alignment
The performance of an LED wall depends entirely on both stability and proper panel alignment regardless of the selected support system:
- Bolted connections should maintain a firm grip on LED panels to stop them from moving unintentionally.
- The implementation of reinforced frames uses weight distribution to distribute force evenly and protect the individual components from damage.
- Before placing LED panels, perform structural weight tests on the support structure to verify its capacity to deal with panel weight and environmental factors.
- Adequate panel alignment must be achieved to eliminate space between panels and smooth image visualization.
- Future maintenance requires easily accessible points for mounting and service door placement.
Step 5: Installing the LED Panels

Installing the LED panels stands as a fundamental stage of LED wall setup which demands precise execution for attaining a perfect image quality. Installation methods between outdoor cabinets and indoor non-cabinet installations produce different execution processes.
Outdoor Installation with Cabinet
1. Securing the LED Cabinets
- Mount the cabinets across the pre-made steel scaffolding by adding mounting brackets and securing them with bolts.
- Use proper mountings that fix each cabinet tightly to stop movement during wind or external motion.
- Check the structural stability before advancing to the following step.
2. Aligning the Panels for a Seamless Display
- You should use laser guides in combination with leveling tools to achieve accurate alignment.
- Adjust each cabinet’s positioning for complete removal of visible gaps and misalignments.
- Uniform displays result from locking mechanisms secured between the panels.
3. Connecting Power and Signal Cables

Signal Cable Connection

AC Cable Connection
- Apply waterproof connectors for all cable connection points, then tighten every cable securely.
- Protective conduits must carry power cables since they prevent weather damage to the electrical system.
- The signal cables should link in a daisy-chain format for continuous data transmission to every panel.
- Creating labels on your connections simplifies the process for future maintenance procedures.
4. Performing Initial Power Tests
- Activate the LED wall only after checking for proper functionality on each cabinet one by one through the individual power-up process.
- Know if there are recurring power interferences or connectivity problems.
- Every LED product panel must have consistent brightness.
Indoor Installation Without Cabinet
1. Mounting the LED Modules Directly to the Frame
- Position the LED components to the mount through magnetic or screw fasteners.
- Streamlined appearance results when each module lies directly against the mounting surface.
- A frame needs to be totally level for the installation of more panels to proceed.
2. Connecting Power and Data Cables
Power Supply and Cable Installation
- An effective cable organization system prevents both cable clutter and components from overheating.
- Follow a systematized procedure when you connect all LED modules to both the power source and data controller components.
- Apply a voltage test procedure to check that every module receives consistent power distribution.
3. Aligning LED Tiles for a Smooth Display
- Every module requires precision adjustments to reach pixel-by-pixel alignment.
- Image testing must take place for checking that no dead pixels along with color discrepancies exist.
- The visual display becomes more consistent when engineers adjust the brightness alongside their work on contrast settings.
4. Testing and Calibration
- The testing process requires test patterns to detect all areas that show LED panel misalignment.
- Programmed applications enable users to solve color uniformity issues that arise within the display.
- The system should examine all LED panels to verify their correct input signal response.
Final Checks Before Activation
- Stability Test: A stability check must involve pressing lightly on each part of the panels to ensure they remain stable.
- Cable Checks: All cables should be inspected for proper fastening, which helps avoid unplanned disconnections.
- Full System Power Test: Operate a Full System Power Test to activate the whole LED wall system through inspections under various operational conditions.
- Monitor for Flickering or Dead Pixels: The consistent bright display functionality should be tested by running content during examinations to check for pixel flickering or death.
Step 6: Connecting the Controller and Software Configuration
When you integrate the controller with appropriate software, you establish operational conditions that enable proper functioning of your LED wall system. Visual displays depend on the controller to function as their main processing unit, which sends signals to generate content based on program instructions.
Choosing the Right Video Processor
- The selection of your video processor depends on how your LED wall requires resolution and input specifications.
- Processors supporting 4K resolution need access to multiple input sources with live scaling capabilities to deliver excellent playback quality.
- Assess if the processor works for your LED panels and controls both authorized refresh rates with specified color depths.
- Some processors contain onboard setup operations and tuning tasks through their calibration system.
Installing Content Management Software
- Choose software that corresponds to your application needs.
- Colorlight and NovaStar are two companies that offer LED display content management solutions.
- The software application requires sufficient CPU processing capacity, which indicates the need for a specialist control PC to run this program.
- The LED wall must have configuration settings to enable network-based content management and cloud-based update access.
Configuring the Display Layout and Inputs
- The controller interface enables users to arrange LED panels while checking their correct position through its interface.
- When configuring the processor, feed the measurement data for width and height dimensions and the installation area ratio.
- All video feed connections to your system need to use HDMI as well as DisplayPort alongside SDI and network streaming access points.
- Additional input options should always be activated if you need automatic source feed adjustments.
Calibrating Colors and Brightness
- LED panel uniformity depends on performing color temperature adjustments and gamma correction simultaneously for their maintenance.
- The brightness calibration procedure allows maximum visibility by adjusting illumination settings.
- Within this system, users access built-in patterns to detect dead pixels, verify brightness levels, and monitor screen section alignment.
- The software features automatic synchronizations between all display panels to match their brightness standards and color settings simultaneously.
Setting Up Control and Remote Management
- The remote monitoring of LED walls demands the installation of either a control PC or a hardware processor depending on where the system needs activation.
- The application of real-time panel performance evaluation along with scheduled content updates should be implemented through LAN and Wi-Fi network systems.
- The software should contain automated backup systems that activate substitute inputs upon primary video failures.
- Businesses need to set up cloud-based management solutions that allow distant troubleshooting of large LED systems.
Testing the Configuration
- Diagnostic tests should be performed first to confirm uniform coverage of video distribution to all LED panels.
- Check video output quality to evaluate delay duration while looking for frames that drop and artifacts that could appear.
- The system needs to test video content and images and real-time streaming through a combination of playback methods for smooth playback continuance.
- Establish hardware that guarantees continuous refresh cycles and prevents any flickering phenomena throughout system operation.
Step 7: Testing and Troubleshooting
The successful operation of your LED wall system depends on testing and troubleshooting procedures that need to be implemented following successful installation.
- The initial testing process needs to confirm that all the panels maintain proper connections while checking the status of transmitted signals. The system requires correct functioning connections between signal cables and power supplies and controllers.
- Different test video formats and resolutions must be played to test screen presentation accuracy and ensure technical success and no related performance issues occur.
- Pixel calibration tests should be performed to correct the brightness unevenness together with dead pixel issues. New panel installation or calibration work needs to happen to obtain a uniform visual presentation.
- The LED wall undergoes a stress test during continuous operation to evaluate heating issues and electrical stability as well as to detect potential performance faults.
- Perform examinations on cooling systems and cables during the prolonged test to detect any strain areas.
8. Maintenance

Maintenance procedures need implementation on a regular basis to increase the lifespan of an LED wall system.
- Regular cleaning of LED panels with soft fiber cloths will prevent dust accumulation. Use only soft brushes to clean along with chemical-free products that will not harm panel elements or electronics.
- Routine inspections should identify all faulty cable connections and worn components in addition to checking loose wiring. Prolonged system operation becomes minimized through swift replacement of broken components.
- Perform frequent firmware updates because this allows you to access new versions that enhance display performance and bring optimal features.
- Active system monitoring should be combined with ventilation control for facilities that have outdoor installations.
- Set up surge protectors together with waterproof enclosures as protective measures to defend hardware from power surges and environmental elements.
LED Wall Installation Tips
- Organize cables with specific labels in management systems to create easy cable maintenance and improved debugging abilities. The combination of correct route placement eliminates signal disruption and produces a nicer visual outcome.
- Strong mounting hardware systems decrease the chance of equipment misalignment and vibration-induced destruction.
- Screen visual quality needs adjustment through resolution selection in addition to brightness and contrast settings that match the viewing distance against environment lighting. Good content = more engagement.
- Backups coupled with surge protectors should be used as a redundant power supply to protect systems from power interruptions and over-voltages.
- Scheduled maintenance allows the detection of small issues, which prevents them from turning into major concerns.
- Outdoor LED walls need waterproof panels together with UV-resistant coatings that must be enclosed within sealed protective structures.
- Consult professionals whenever you handle complicated or extensive installations because they will provide essential advice to prevent mistakes while saving time
Conclusion
Successful establishment of an LED wall requires proper planning and correct parts selection alongside execution procedures. The steps defined here will lead you to achieve both high-quality and easy-to-manage displays regardless of whether you install the display outdoors with cabinets or indoors without cabinets. The combination of maintenance and calibration activities will increase longevity while bettering performance, which will result in your investment becoming a beautiful sight for numerous years.