NovaStar VX600 Pro One Stop Configuration Guide: From Basic Settings, Layer Management to Screen Calibration
Novastar VX600 Pro isn’t just a video wall controller—it’s the command center for professional LED video walls. This guide cuts through the complexity to give you clear, actionable steps for initial setup, advanced layer management, and precise screen configuration—so you can deploy, control, and scale your displays with confidence.
1.Novastar VX600 Pro overview
Novastar VX600 Pro as a true all in one controller, it integrates video processing, input switching, layer compositing, and output management into a single industrial chassis—eliminating the need for external scalers, switchers, or backup devices. Whether you’re deploying a fixed installation or managing a touring show, the VX600 Pro delivers reliability, flexibility, and pixel-perfect control.


Key Specifications of Novastar VX600
| Feature | Specification |
| Input Connectors | 1x HDMI 2.0 (IN & LOOP), 2x HDMI 1.3, 1x 10G Optical Fiber Port (OPT 1), 1x 3G-SDI (IN & LOOP) |
| Output Connectors | 6x Gigabit Ethernet Ports, 2x Fiber Outputs, 1x HDMI 1.3 for Monitoring |
| Max Output Resolution | 4K×2K @60Hz |
| Pixel Capacity | Up to 3.9 million pixels |
| Layer Support | Supports up to 6 layers with flexible layer sizes and priorities |
| Audio I/O | 3.5 mm independent audio input/output |
| Backup Features | Dual receiving card backup, end-to-end backup, OPT port backup |
| Operating Modes | Video Controller, Fiber Converter, ByPass |
| Certifications | CE, FCC, IC, PSE, RCM, EAC, UL, CB, KC, RoHS |


2.Understanding the Key Features of Novastar VX600 Pro
VX600 Pro stands out as a powerful all in one controller, integrating advanced features that cater to both novice users and seasoned professionals. Below, we delve into its core functionalities.

Video Input and Output Capabilities
VX600 Pro supports multiple video inputs, including HDMI 2.0, HDMI 1.3, 3G-SDI, and optical fiber ports. This versatility allows it to handle resolutions up to 4K×2K@60Hz, ensuring crystal-clear image quality. Additionally, the device’s self-adaptive OPT 1 port can serve either as an input or output connector depending on your setup needs.
Key highlights:
- HDMI 2.0: Supports resolutions up to 4096×2160@60Hz.
- 3G-SDI: Ideal for professional broadcast applications.
- OPT Ports: Enable long-distance signal transmission with copy/backup modes.
Layer Management Features
One of the standout features of the VX600 Pro is its ability to manage up to 6 layers, each capable of handling different resolutions such as 4K×2K, 4K×1K, or 2K×1K. These layers can be independently adjusted in size, position, priority, and aspect ratio, allowing for creative flexibility in content display.
Key features include:
- 6 Layers: Create dynamic visual presentations by overlaying multiple video sources.
- Custom Scaling: Full screen, pixel-to-pixel, or custom scaling options.
- OSD Functionality: Add text or image overlays for branding or informational purposes.
Audio Input/Output Functions
In addition to its impressive video capabilities, the VX600 Pro provides comprehensive audio support:
- Accompanied Audio: Automatically syncs with HDMI sources.
- Independent Audio: 3.5 mm audio input/output jacks for external devices.
- Volume Control: Adjustable output volume via front panel knobs or remote control.
3.Getting Started with the Novastar VX600 Pro Setup
Setting up the VX600 Pro involves connecting the necessary cables, configuring basic settings through the LCD menu, and ensuring proper communication between the video wall controller and LED screen.
Initial Steps:
- Connect Power Supply: Use the provided power cord to connect the device to a stable power source.
- Attach Input Sources: Plug in HDMI, SDI, or fiber optic cables based on your project requirements.
- Link Ethernet Ports: Connect the six Gigabit Ethernet ports to the corresponding LED cabinets.
- Power On: Press the power button and wait for the system to initialize.
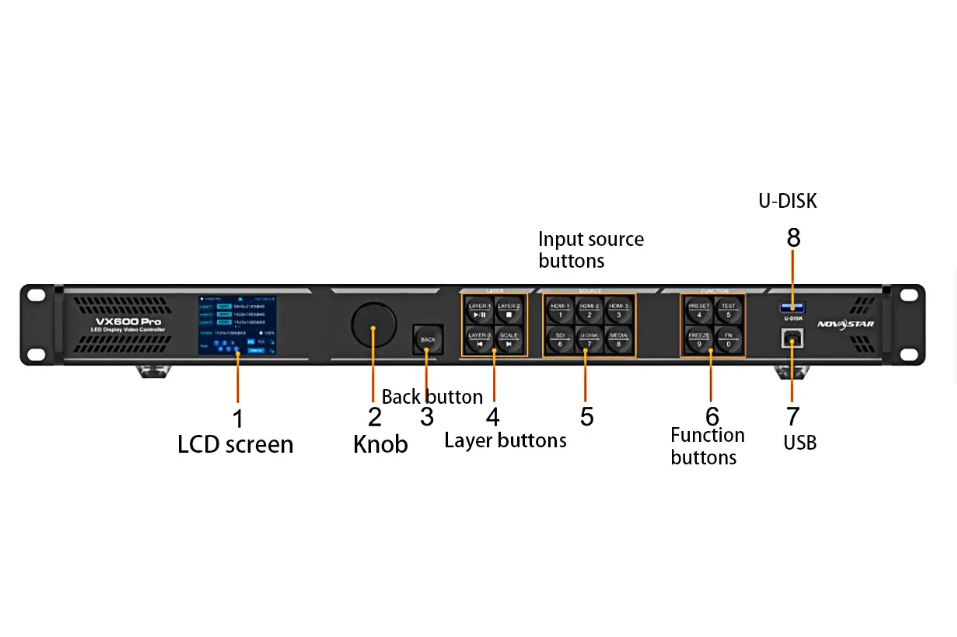
Once powered on, use the front panel knob to navigate the LCD menu and configure essential parameters like screen brightness, resolution, and EDID settings.
4.Step-by-Step: Creating and Managing Layers on Novastar VX600 Pro
Layer management is one of the strengths of the Novastar VX600 Pro as a professional video wall controller. With support for up to six independent layers, it enables dynamic compositions like picture-in-picture, live score overlays, or multi-camera monitoring—all processed in real time within this all in one controller.
You can create and adjust layers using NovaLCT (Novastar’s PC software), the front-panel LCD menu, or the Unico Web interface. The following steps walk you through the essential workflow:
Step 1: Access Layer Settings
Start by entering the layer management section. In NovaLCT, go to the “Screen” tab and select “Layer Management,” then click “Add Layer.” If you’re working directly on the device, rotate the front-panel knob to navigate to System Settings > Layer Settings and choose “Add Layer.” Each new layer must be linked to an active input source—such as HDMI 1, SDI, or internal USB playback.

Step 2: Configure Layer Properties
Once a layer is created, define its visual behavior. Assign the input source, then adjust its size and on-screen position using X/Y coordinates or drag-and-drop in NovaLCT. Set the layer’s priority (Z-order) to control which content appears on top—critical when overlapping graphics and video. Choose a scaling mode: “Full Screen” stretches the source, “Pixel-to-Pixel” preserves original resolution, and “Custom” lets you fine-tune aspect ratio without distortion.
Step 3: Fine-Tune Display and Source Details
Enhance visual quality with per-layer color adjustments—tweak brightness, contrast, saturation, and hue to match other layers or correct source inconsistencies. Use the input crop function to trim black borders or zoom into a specific region of the source (e.g., isolating a presenter from a wide shot). For broadcast or event use, enable the OSD (On-Screen Display) feature to overlay text—like event names or channel IDs—directly onto any layer.
Keep in mind that the VX600 Pro allocates its internal video processing resources based on layer resolution and count. A single 4K×2K layer uses more bandwidth than two 2K×1K layers, so plan your layout to stay within system limits and avoid performance warnings.
Example Workflow:
| Action | Description |
| Add Layer | Drag an input source onto the canvas to create a new layer. |
| Set Priority | Higher priority layers appear above lower ones; adjust accordingly for layered visuals. |
| Enable 3D Mode | Pair with compatible 3D glasses for immersive viewing experiences. |
5.Step-by-Step: Configuring Screen Resolution and Physical Layout
Correctly setting your screen’s resolution and physical layout is essential for the VX600 Pro to display content across the full LED wall. This configuration is done in NovaLCT, Novastar’s official control software.
Step 1: Define Your Cabinet Type
Open NovaLCT and go to Screen > Cabinet Library. Click Add to create a new cabinet model. Enter:
- Cabinet Width and Height in pixels (e.g., 256 × 256)
- Scan Type (e.g., 1/8, 1/16 — check your receiving card specs)
- Save the cabinet. You only need to do this once per cabinet type.
Step 2: Set Total Screen Size
In Screen Configuration, select the cabinet you just created. Then enter:
- Cabinet Row Quantity: Number of cabinets stacked vertically
- Cabinet Column Quantity: Number of cabinets placed horizontally
The software automatically calculates total screen resolution (e.g., 10 cabinets × 256px = 2560px wide).
Step 3: Assign the Starting Port and Direction
Under Quick Configuration, set:
- Starting Port: Usually Port 1 (must match your physical first connection)
- Data Flow (Front View): Choose the direction that matches your cabling—typically Left to Right, Top to Bottom
If your screen starts from a different corner (e.g., bottom-left), adjust accordingly. A wrong setting causes the image to appear flipped or offset.
Step 4: Preview and Verify
Click Preview to see a simulated output. Then press Send to apply the layout to the VX600 Pro. If your receiving cards support it, use Mapping mode to light up each cabinet with its logical ID—this confirms your software layout matches the physical wiring.
Once complete, any input source will scale correctly across the entire screen. This step must be done before layer management or advanced effects will display properly.
6.Using Multiple Input Sources in a Single Display Layout
Novastar VX600 Pro lets you combine up to six different input sources—such as HDMI cameras, SDI feeds, USB media players, or fiber signals—into a single cohesive display using its layer system. No external switchers or scalers are needed.
Step 1: Connect All Input Sources
Plug your devices into the available ports:
- HDMI 2.0 / HDMI 1.3: For laptops, cameras, or media players
- 3G-SDI: For broadcast cameras or professional video routers
- OPT (Optical Fiber): For long-distance transmission or backup links
- USB Playback: Load videos directly from a USB drive (via internal player)
Ensure each source is powered on and outputting a valid signal before proceeding.

Step 2: Create a Layer for Each Source
In NovaLCT, go to Screen > Layer Management and click Add Layer for each input:
- Set Source to the corresponding port (e.g., “HDMI 1”, “SDI”, “USB”)
- Adjust Position and Size to place the window where you want it
- Set Priority (Z-order) so important content stays on top
You can mix resolutions—for example, a 4K HDMI feed as background and a 1080p SDI camera in a picture-in-picture window.
Step 3: Optimize Scaling and Crop
For each layer, choose a scaling mode:
- Full Screen: Stretches to fill the layer area (may distort)
- Pixel-to-Pixel: Preserves original aspect ratio (adds black bars if needed)
- Custom: Manually adjust scale and offset
Use Input Crop to zoom into a region of interest—like cropping a 4K desktop to show only a specific application window.
Step 4: Manage Audio (If Needed)
Only one audio source can be output at a time. In System Settings > Audio, select:
- Accompanied Audio: Follows the currently active HDMI layer
- Independent Audio: Use the 3.5 mm input for external mixers
- Volume can be adjusted via the front-panel knob or remote control.
Tip: If a source disappears when another layer is added, check that total resolution across all layers doesn’t exceed the VX600 Pro’s processing limit (max 4K×2K input per layer, 3.9M total pixels). Also ensure no two layers are assigned to the same input port unless using copy/backup mode on OPT.
7.Conclusion
You now have everything you need to set up, layer, and control multi-source content on your Novastar VX600 Pro video wall controller—from defining your screen layout to combining live cameras, playback files, and computer feeds in a single display.
If you’re setting up for the first time, start with a simple two-layer layout (e.g., full-screen background + PIP camera) to test signal flow and scaling. Once that works reliably, expand to more complex designs.