Novastar VX400Pro Integrated Controller Technology Analysis and Setting Tutorial
This guide provides essential information to set up, configure, and operate your Novastar VX400Pro all in one controller. It covers everything from understanding the key features to advanced configuration options. By following these instructions, you can maximize the performance of your LED display setup and ensure smooth operation and efficient management of video inputs and outputs.
1.Novastar VX400Pro All-in-One Controller overview
Novastar VX400 Pro is a compact yet powerful all in one controller designed for professional LED displays. Supporting up to 720 high scan configurations, it delivers crisp image quality with multi-layer processing and low-latency performance. Ideal for fixed and rental installations, it integrates video processing, scaling, and control in a single unit. With flexible inputs and NovaLCT software compatibility, the VX400 Pro offers reliable, high-resolution output for demanding visual environments.

VX400Pro stands out due to its versatility and powerful features:
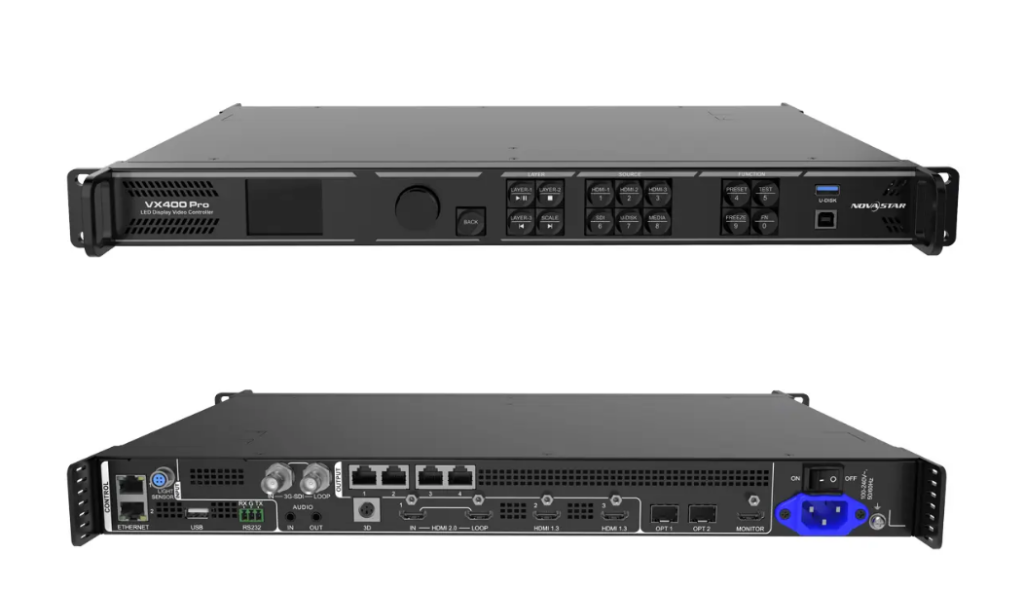
Multiple Input Connectors
It includes HDMI 2.0 (IN & LOOP), two HDMI 1.3 ports, a 10G optical fiber port, and a 3G-SDI input. Additionally, it has a USB 3.0 port for playing media files directly from a USB drive.
Output Flexibility
With four Gigabit Ethernet ports and two optical fiber outputs (OPT 1 and OPT 2), the Novastar controller VX400Pro offers flexible output configurations, including backup and copy modes.
Low Latency
By enabling the low latency feature and Bypass mode, the device can reduce delay to zero frames, ensuring real-time performance.
Pixel-Level Calibration
Working with NovaLCT and NovaStar calibration software, the VX400Pro supports brightness and chroma calibration at the pixel level, delivering superior image quality.
User-Friendly Interface
The front panel of Novastar VX400Pro all in one controller includes a knob, LCD screen, and dedicated function buttons for easy navigation and control.
 100vw, 1200px” data-dt-location=”https://www.eagerled.com/novastar-vx400pro-all-in-one-controller/novastar-vx400pro-all-in-one-controller-dimensions/” data-lazy-src=”https://www.eagerled.com/wp-content/uploads/2025/12/Novastar-VX400Pro-All-In-One-Controller-Dimensions.webp” /></div>
</figure>
</div>
<div id= "Novastar VX400Pro All In One Controller Dimensions LED Display Manufacturer in China EagerLED")
VX400Pro Supported Working Modes
| Mode | Description |
| Video Controller | Combines video processing and transmission for LED screens. |
| Fiber Converter | Transmits video signals via optical fiber for long-distance applications. |
| Bypass | Outputs video signals without processing, suitable for simple setups. |
Novastar VX400Pro all in one controller Specifications
| Max Output Resolution | 10,240 × 8,192 pixels |
| Input Support | HDMI 2.0, 3G-SDI, USB, DP (via adapter) |
| Max Input Resolution | 4K@60Hz |
| Layers Supported | Up to 6 layers |
| Scan Support | Up to 720 high |
| Latency | As low as 0 frames (ByPass mode) |
| Fiber Ports | Dual 10G SFP+ (OPT 1–4) |
| Control Interfaces | Front panel, NovaLCT, Unico Web, VICP App |
| Media Playback | USB playback with playlist support |
| Certifications | CE, FCC, UL, RoHS |
 100vw, 1200px” data-dt-location=”https://www.eagerled.com/novastar-vx400pro-all-in-one-controller/novastar-vx400pro-all-in-one-controller-applications/” data-lazy-src=”https://www.eagerled.com/wp-content/uploads/2025/12/Novastar-VX400Pro-All-In-One-Controller-Applications.webp” /></div>
</figure>
</div>
</div>
</div>
</div>
</div>
<div id= "Novastar VX400Pro All In One Controller Applications LED Display Manufacturer in China EagerLED")
2.Comparison: Novastar VX400Pro vs. VX400 All in One Controller
Novastar VX400Pro isn’t just a name variant—it’s a significant upgrade over the VX400, designed for high-performance LED deployments. Here’s what changed:
| Feature | VX400Pro | VX400 | Why It Matters |
| Input Resolution | 4K@60Hz (HDMI 2.0) | 1080p@60Hz | Supports modern 4K sources without downscaling |
| Video Layers | Up to 6 | Up to 2 | Enables complex picture-in-picture, overlays, and live+playback mixes |
| Bypass Mode | True 0-frame latency | Not supported | Critical for real-time applications (e.g., sports, AR, broadcast) |
| 3D Sync | Built-in support | Requires EMT200 box | Reduces cost and cabling complexity |
| High-Scan Support | Full compatibility with high-scan fine-pitch cabinets | Limited | Better brightness uniformity and camera-friendly performance |
3.A Step-by-Step Guide to Setting Up the Novastar processor VX400Pro
Setting up the Novastar processor VX400Pro is straightforward, thanks to its intuitive interface and comprehensive manual. Below is a step-by-step guide to help you get started:
Step 1: Hardware Connections
- Connect Input Sources: Plug your video sources into the appropriate input ports (e.g., HDMI, 3G-SDI, or optical fiber).
- Link Ethernet Ports: Use Cat6 cables to connect the Novastar VX400Pro’s Ethernet ports to the receiving cards of the LED screen.
- Power On: Ensure the device is powered using the included power cord.
Step 2: Initial Configuration
- Access the Home Screen: Power on the device and navigate to the home screen using the front panel knob.
- Set Screen Brightness: Adjust the brightness according to ambient lighting conditions.
- Configure Screen Layout: Use the Quick Configuration option to define the number of cabinets and their arrangement.
 100vw, 1156px” data-dt-location=”https://www.eagerled.com/novastar-vx400pro-all-in-one-controller/novastar-vx400pro-screen-configuration/” data-lazy-src=”https://www.eagerled.com/wp-content/uploads/2025/12/Novastar-VX400Pro-Screen-configuration.webp” /></div>
</figure>
</div>
<div id= "Novastar VX400Pro Screen configuration LED Display Manufacturer in China EagerLED")
Step 3: Advanced Settings
 100vw, 1668px” data-dt-location=”https://www.eagerled.com/novastar-vx400pro-all-in-one-controller/vx400pro-advanced-configuration/” data-lazy-src=”https://www.eagerled.com/wp-content/uploads/2025/12/VX400Pro-Advanced-configuration.webp” /></div>
</figure>
</div>
<div class= "VX400Pro Advanced configuration LED Display Manufacturer in China EagerLED")
- Enable Low Latency: Navigate to Advanced Settings > Low Latency and toggle the feature on.
- Set Sync Source: Choose an internal or external sync source under Synchronization settings.
- Backup Configuration: Configure device backup and Ethernet port redundancy for added reliability.
4.VX400Pro All in One Controller Advanced Configuration Options
Novastar VX400Pro All in One Controller provides numerous advanced configuration options to optimize performance for specific applications.
Free Topology
One standout feature is the ability to configure screens without rectangular restrictions. This allows for creative and unconventional screen designs, provided the overall circumscribed rectangle remains within the device’s loading capacity.
EDID Management
Novastar processor VX400Pro supports importing and exporting EDID files, ensuring compatibility with a wide range of video sources. This is especially useful when dealing with HDCP-encrypted content.
Steps to Import EDID:
- Save the EDID file (.bin or .dat) to a USB drive.
- Insert the USB drive into the Novastar VX400Pro all in one controller.
- Go to Advanced Settings > Input Settings > EDID and select “Import.”
Audio and Video Synchronization
For projects requiring synchronized audio and video, Novastar controller VX400Pro ensures seamless integration. You can configure audio output through multifunction cards connected to Ethernet ports 1 or 2.
5.How to Customize Layer Settings on the Novastar VX400Pro
Layer customization is one of the most powerful features of the Novastar controller VX400Pro. With support for up to six layers, users can create dynamic and visually engaging displays.
Adding Layers
To add a layer:
- Press the LAYER button on the front panel or navigate to Layer Settings in the menu.
- Select “Add Layer” and choose the desired input source.
- Configure the layer size, position, and priority.
Table: Layer Properties
| Property | Description | Range/Options |
| Size (Width/Height) | Defines the dimensions of the layer. | 64–32768 pixels |
| Position (X/Y) | Sets the starting coordinates of the layer. | -250000 to 248080 pixels |
| Priority | Determines the z-order of the layer. | 1 (lowest) to 3 (highest) |
| Scaling Mode | Adjusts how the layer fits on the screen. | Full Screen, Pixel-to-Pixel, Custom |
Input Cropping
For precise control over what appears on the screen, enable input cropping:
- Navigate to Layer Settings > Input Crop.
- Define the crop area by setting width, height, and starting coordinates.

6.Managing Video Inputs and Outputs on the Novastar VX400Pro
Novastar VX400Pro offers unparalleled flexibility in managing video inputs and outputs.
Input Settings
- Switch Connector Capacity: Adjust the input connector capacity based on the video source (e.g., SL, DL, or 4K).
- Set Input Resolution: Configure standard or custom resolutions for HDMI and DVI inputs.
- Mosaic Sources: Combine multiple input sources into a single mosaic layout for unique visual effects.
Output Settings
- HDMI Monitoring: Use the HDMI 1.3 output for monitoring purposes.
- Optical Fiber Backup: Configure OPT 2 to copy or back up the output from Ethernet ports 1–4.
- Test Patterns: Generate test patterns to verify screen connections and troubleshoot issues.
7.Conclusion
Now that your Novastar VX400Pro all in one controller is up and running, you’re equipped to manage high-performance LED displays with confidence. For the latest firmware, configuration tools like NovaLCT, or detailed technical documentation, visit www.novastar.tech. If you need help optimizing your setup or selecting the right controller for your project, reach out to an authorized Novastar partner—because every great display starts with a smarter controller.