Novastar H5 Video Splicing Processor: Detailed Installation and Configuration Guide and Advanced Features Guide
Novastar H5 Video Wall Splicer is a professional-grade video wall processor used to manage multi-screen LED display or LCD displays in control rooms, retail spaces, and event venues. If you’ve just unboxed your H5—or are planning to deploy one—this guide gives you exactly what you need: clear, step-by-step instructions for setup, configuration, and troubleshooting. No jargon, no fluff—just the essentials to get your video wall running fast.
1.What Is Novastar H5 Video Wall Splicer?
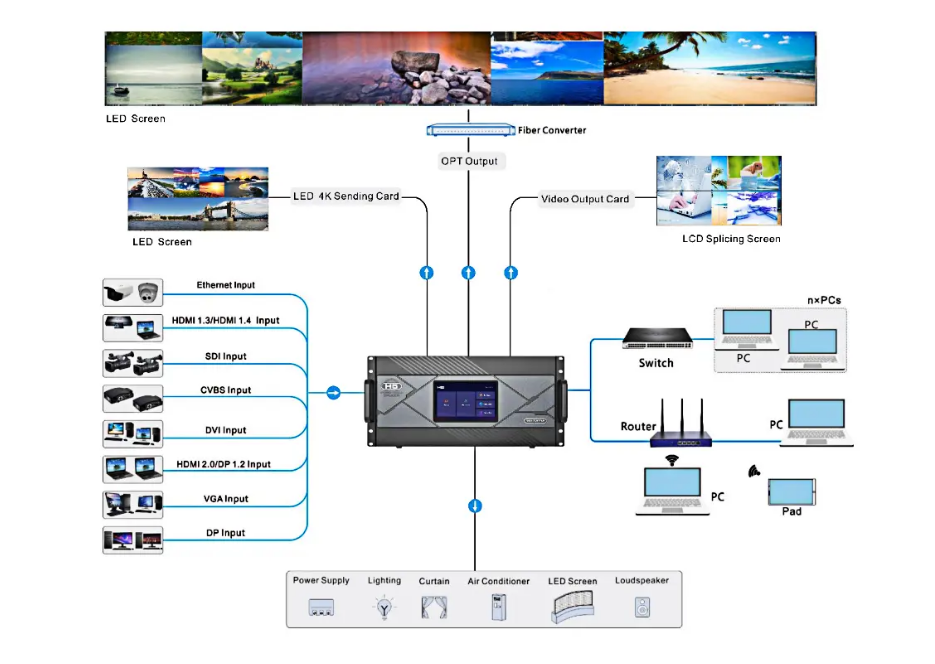
Novastar H5 Video Wall Splicer is a next-generation video wall processor built for fine-pitch LED displays. It acts as a centralized video wall controller, delivering reliable, high-performance signal management for control rooms, security centers, exhibitions, and live events.

With the H5, you get:
- Flexible system configuration – Hot-swappable input/output cards let you mix HDMI, DisplayPort, SDI, and IP streams in one chassis.
- Seamless 4K@60Hz output – Low-latency processing ensures smooth, synchronized playback across large video walls.
- Simplified remote operation – Manage layouts, sources, and presets through a web browser—no dedicated PC required on-site.
- Rich visual enhancements – Support for HDR10, 3D content, and real-time on-screen display (OSD) overlays like time, weather, or custom text.
- Future-ready scalability – Add or replace cards without downtime, adapting to evolving project needs.
2.Specification of Novastar H5
Understanding the technical specifications of the H5 video wall splicer is essential for optimal configuration. Below is a detailed breakdown:
| Feature | Details |
| Max Input Cards | 10 |
| Max Output Cards | 3 |
| Max Layers | 48 (16x SL, 8x DL, 4x 4K) |
| Input Connectors | HDMI, DVI, DP, VGA, CVBS, SDI, IP |
| Output Connectors | RJ45, Fiber, HDMI, SDI |
| LED Sending Card Options | H_20xRJ45, H_16xRJ45+2xfiber, H_4xfiber |
| Max Loading Capacity | Up to 62.4 million pixels (H_4xfiber sending card) |
| Supported Resolutions | Up to 8K@30Hz |
| Frame Rates | Decimal frame rates supported |
| HDR Processing | HDR10 and HLG |
| Audio Support | Accompanied audio for HDMI/DP inputs |
| Backup Design | Backup between devices, input sources, and LED sending cards |

3.How to Install Novastar H5 Hardware Step by Step
Follow these steps to correctly install your Novastar H5 video wall splicer in a standard 19-inch rack:
Step 1: Prepare the Rack
- Ensure the rack can support at least 4× the total weight of installed equipment.
- Mount the H5 horizontally using eight M5 screws (provided). Ventilation is critical—avoid tight spaces or enclosed cabinets.
Step 2: Insert Input and Output Cards
- Locate the silk-screen labels on the rear panel:
“I-x” slots are for input cards (e.g., HDMI, SDI). - “O-x” slots are for output cards (e.g., RJ45, fiber).
- Insert the correct cards based on your project needs (e.g., H_4xHDMI, H_16xRJ45+2xfiber).
- Always wear an anti-static wrist strap when handling cards to prevent damage.


Step 3: Connect Power Supply
- Plug the power cord into the rear connector (AC 220V ±10%).
- Connect the other end to a grounded outlet with surge protection.
- Avoid shared circuits with high-power devices.
Step 4: Configure Control Card
- Connect the control PC via Ethernet to the H_Control card’s port.
- Use a router or switch for multi-user access in team environments.
- Ensure both the H5 and control PC are on the same network segment (e.g., 192.168.0.x).

Step 5: Power On
- Set the rocker switch on the H_Control card to “ON”.
- Wait 30–60 seconds for the home screen to appear.
- The default IP address will be displayed: 192.168.0.10 (valid only during first boot; use NovaLCT to find it later).
4.Connecting Input Sources to Your H5 Splicer
The Novastar H5 supports multiple input types—HDMI, DVI, VGA, SDI, and IP streams. Connect them correctly to avoid signal loss or handshake issues.
Identify your input card type
Check the silkscreen on the rear panel:
- H_4xHDMI: Accepts HDMI 1.4 up to 1920×1200@60Hz
- H_2xSDI: Supports 3G-SDI (up to 1080p60) or 12G-SDI (4K30) depending on model
- H_2xRJ45 IP: For RTSP/ONVIF streams from IP cameras or NVRs
Use the right cables
- HDMI/DVI: Use shielded cables ≤15m. For longer runs, add an active extender.
- SDI: Use BNC coaxial cable (RG6 or better). Keep runs under 100m for 3G-SDI.
- IP: Connect directly via Cat6 to your network switch—not to the control PC port.
Match resolution and refresh rate
- Ensure your source output matches what the H5 input card supports.
- Example: Do not send 4K60 over HDMI to an H_4xHDMI card—it only handles up to WUXGA (1920×1200).
- Disable HDR or deep color on sources if the input signal flickers or drops.
Verify signal detection
- After connecting, open NovaLCT → Input Signal tab.
- A green icon next to the port means signal is locked. Red or gray means no signal—check cables, power, and source settings.
Set EDID manually if needed
- If a source fails to output, go to EDID Management in NovaLCT.
- Clone EDID from a working display or select a standard preset (e.g., “1920×1080@60Hz”) to force compatibility.
5.Configuring LED Wall Outputs with RJ45 or Fiber
Novastar H5 video wall splicer drives LED displays through dedicated output cards—either RJ45 Ethernet ports for short distances or fiber-optic (OPT) ports for long runs. Choose and configure the right method based on your screen layout and cabling.
Select the correct output card
H_16xRJ45+2xFiber: Most common for LED walls.
- Ports 1–16: RJ45 (Gigabit Ethernet)
- OPT 1: Mirrors data from RJ45 ports 1–8
- OPT 2: Mirrors data from RJ45 ports 9–16
H_20xRJ45: Higher density, no fiber—ideal for compact 4K LED setups.
Connect via RJ45
≤100 meters
- Use Cat6 or better cables from each RJ45 port to your LED receiving cards (e.g., MCTRL600, VX4S).
- Match port numbers to your physical screen layout (e.g., Port 1 = top-left panel).
- Do not daisy-chain—each port drives one receiver chain independently.
>100 meters
- Plug OPT 1 or OPT 2 into a NovaStar-compatible fiber converter (e.g., FSN series).
- Then run duplex LC fiber cable to the remote receiving end.
- Fiber is immune to EMI—use it in stadiums, factories, or outdoor installations.
Configure in NovaLCT
- Go to Screen Settings → Associate Outputs.
- Only ports of the same type and resolution can be grouped on one virtual screen.
- For H_16xRJ45+2xFiber cards, you’ll see virtual 4K connectors—assign your LED screen size here (e.g., 3840×2160).
Verify signal and sync
- After mapping, check that all LED panels light up uniformly.
- Use Self-Test mode in NovaLCT to confirm frame.
- synchronization across the entire wall.
- With proper output configuration, your Novastar H5 delivers pixel-perfect, low-latency video across any LED video wall—near or far.
6.Using NovaLCT to Control the Video Wall Controller
NovaLCT is the official Windows software for managing your Novastar H5 video wall controller. It handles everything from screen layout to real-time source switching. Here’s how to use it effectively:

Install and launch NovaLCT
- Download the latest version from NovaStar’s official site (Windows only).
- Install with administrator rights—some drivers require system-level access.
- Launch NovaLCT and click Search Device to detect your H5 on the network.
Create a virtual screen
- Go to Screen Settings → New Screen.
- Enter your LED wall’s total resolution (e.g., 3840×1080 for a 4×1 panel array).
- Assign output ports: Only ports from the same output card can be grouped together.
Add and position video layers
- Click Layer Management → Add Layer.
- Choose an input source (e.g., HDMI 1, IP Camera 2).
- Drag the layer to position it; use the Size fields to set exact pixel dimensions.
- Enable Transparency or Border if needed for overlays.
Save and switch layouts
- Save your current setup as a Preset (File → Save Preset).
- Switch between presets instantly during live operation—ideal for events or control rooms.
- Presets include layer positions, sources, OSD text, and scaling modes.
Use remote control features
- Enable Web Control in NovaLCT to allow other users to view or switch presets via browser.
- For multi-operator setups, assign different PCs to monitor-only or full-control roles.
Tip: Always close NovaLCT properly—force-quitting may leave the H5 in an unstable state.
7.When to Choose H5 Over Other Video Wall Solutions
Novastar H5 video wall splicer isn’t the only option—but it’s the right choice in specific scenarios. Here’s when to pick it over software-based systems, all-in-one controllers, or competing hardware processors:
Choose the H5
- You’re building an LED video wall with NovaStar receiving cards (e.g., MCTRL600, VX4S). The H5 integrates natively—no protocol conversion needed.
- You need real-time, low-latency processing (<1 frame delay). Software solutions like Watchout or Datapath FX4 add latency; the H5 processes in hardware.
- Your project requires mixed inputs (HDMI + SDI + IP cameras) on one wall without external switchers.
- You want local control without a dedicated PC running 24/7. The H5 runs standalone once configured.
- Your layout needs dynamic layering (e.g., live camera + ticker + PIP) that must stay synchronized during source switches.
Avoid the H5
- You’re using non-NovaStar LED systems (e.g., ROE, Leyard with other processors)—you’ll lose native calibration features.
- You need 4K60 input passthrough. The H5 maxes out at WUXGA (1920×1200) per HDMI input—use an H8 or VX6S for true 4K.
- Your budget is under $2,000. Entry-level LCD video wall boxes (like TV-style splitters) are cheaper but lack layering or OSD.
- You require touch-back interactivity or Windows-based apps on the wall. The H5 is display-only—it doesn’t run software.
8.Conclusion
Setting up a Novastar H5 video wall splicer requires precision—but you don’t have to do it alone. Whether you’re planning a new installation, troubleshooting signal issues, or unsure which output card to use, our team can help you get it right the first time.Have questions? Need a custom configuration or on-site support?Contact us today for expert guidance tailored to your project.